holiday

brown sugar pumpkin galette with bay ice cream

brown sugar pumpkin galette on millys-kitchen.com

Ok. I’m going to level with you guys. It’s not always easy to turn out a weekly blog post. As I’m sure you can imagine, I sometimes have zero culinary inspiration and Beau and I end up dining on chili from the hotbar at Whole Foods. Some weeks, taking the time to create, prep and shoot a recipe feels like too much. Not to mention finding something engaging to write about it. Sometimes I just don’t want to. 

brown sugar pumpkin galette on millys-kitchen.com

This week was starting to look a lot like a just-don’t-want-to sort of week. I’ve got holiday gift classes to prepare for and I’m getting ready to launch my next culinary tour. It seems like the majority of my friends have had babies in the last month, so I have a mountain of baby gifts to get in the mail. Thursday’s Thanksgiving, which means shopping and cooking and all that jazz.  

But I’ve had this idea for a pumpkin tart floating around in my head for months. And since there is (obviously) no better moment for a pumpkin tart than the week of Thanksgiving, I figured I’d better get on it. 

brown sugar pumpkin galette on millys-kitchen.com

Pumpkin pie has been my favorite Thanksgiving dessert since forever. Apple pie is nice. Pecan pie, delightful. But pumpkin pie, wreathed in a fluffy halo of whipped cream captured my young heart and has held sway over it ever since. For years, my go-to recipe has been this one, with the spices doubled and a little maple and rum thrown in for good measure. This is my dream pumpkin pie--velvety and rich with a complex spiciness. But I’m not so particular when it comes to pumpkin pie; I eat the samples they hand out at the grocery store with almost as much gusto. With the savory-sweetness of pumpkin, a creamy custard base and the alchemy of cinnamon, nutmeg and cloves, it’s pretty tough to mess up pumpkin pie.

brown sugar pumpkin galette on millys-kitchen.com

That said, I wanted to try something different this year. A riff on the classic. Maybe a little less sweet and with the pumpkin itself playing a starring roll. So despite my just-don’t-want-to state of mind, I pulled out the ingredients for galette dough and headed to the market to select a pumpkin. The next day I queued up several episodes of This American Life and got to work. 

Somewhere around the time the disks of dough were in the refrigerator and my pumpkin was neatly peeled and seeded and sliced, I realized that this chilly Monday morning spent chopping and kneading in my warm kitchen was a pleasure and not a slog. There’s something about the methodical nature of baking that clears my head. It’s precise. And technical. You have to focus on the task at hand, which is it’s own sort of meditation. 

Baking this tart turned out to be the perfect antidote to a mounting tide of pre-holiday stress. And it’s almost as good as the ethereal pumpkin pies I remember from my childhood. 

Wishing you and yours a Happy Thanksgiving, whatever sort of pie you fancy!

xo,

Olaiya


brown sugar pumpkin galette on millys-kitchen.com

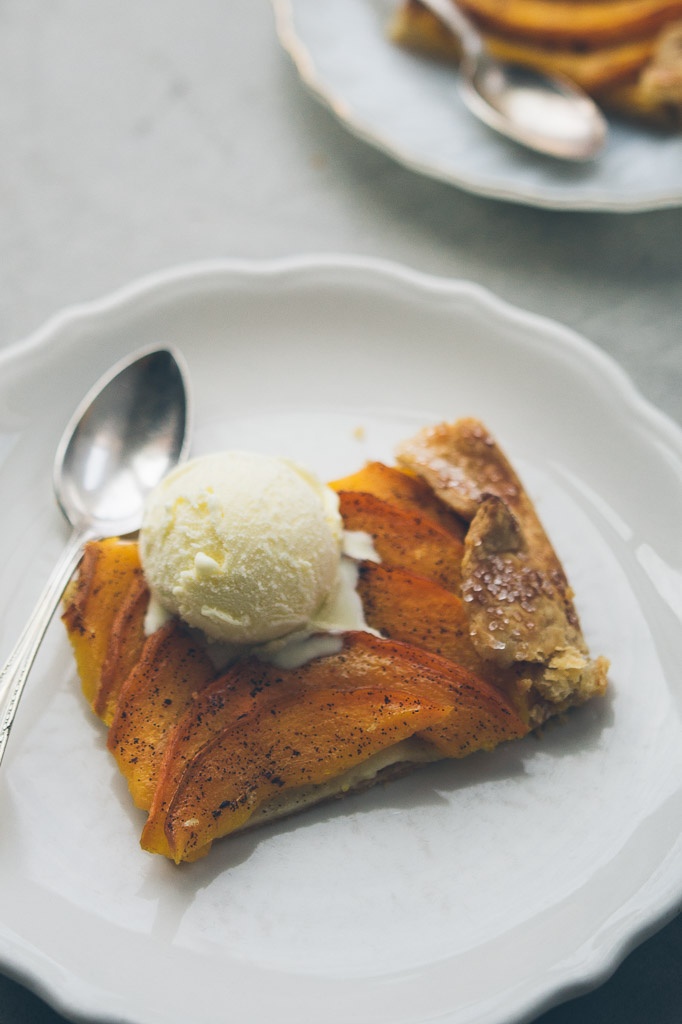
Brown Sugar Pumpkin Galette with Bay Ice Cream

  • ½ recipe Easy Galette Dough (recipe follows)
  • One small baking pumpkin (mine weighed 2 ½ lbs), halved, seeded, peeled and sliced ⅓ inch thick
  • ½ vanilla bean
  • 2 tablespoons granulated sugar
  • ¼ cup light brown sugar, loosely packed
  • ¼ teaspoon salt
  • Pinch (1/16 teaspoon) ground allspice
  • Pinch (1/16 teaspoon) ground cloves
  • Pinch (1/16 teaspoon) ground cinnamon
  • 1 1/2 oz (3 tablespoons) butter, room temperature
  • 2 teaspoons rum (optional)
  • 1 tablespoon milk or cream
  • 1 tablespoon sanding sugar (demerara, turbinado or even plain old granulated sugar will work, too)
  • Bay Ice Cream, to serve (recipe follows)

*Note: You can use any winter squash in this recipe. You might want to add a bit more or less sugar depending on which squash you choose (butternut and acorn are sweeter, kabocha is more savory, etc.). Cook times will vary depending on the variety of squash and how thickly it's sliced.

brown sugar pumpkin galette on millys-kitchen.com

Preheat the oven to 400°F. Line a large rimmed sheet pan with parchment paper. Roll out one disk of dough on a lightly floured work surface into a ¼-inch-thick round or oval. Transfer the dough to the sheet pan.  Arrange the pumpkin over the dough, overlapping the slices slightly and leaving a 1 ½-inch border. Place the sheet pan in the freezer for 10-15 minutes. (This keeps the dough from slumping when you bake your galette.)

Use a paring knife to halve the vanilla bean and scrape the seeds out. Place the vanilla seeds in a small bowl with the granulated sugar. Use your fingers to rub the vanilla into the sugar; this will keep it from clumping. Transfer the vanilla sugar to a medium bowl and add the brown sugar, salt and spices. Whisk to combine then rub the butter and rum into the sugar mixture. 

Remove the galette from the freezer. Crumble the brown sugar mixture over the sliced pumpkin. Fold the dough over the pumpkin and lightly brush the edges of the galette with milk or cream. then sprinkle with the sanding sugar. Bake, rotating the galette as necessary for even browning, until the crust is golden brown and the pumpkin is cooked through, about 60 minutes. Cool slightly before slicing and serving with Bay Ice Cream.


Easy  Galette Dough

  • 13 oz (3 cups) all-purpose flour

  • 1 tablespoon sugar

  • 1 ½ teaspoons salt

  • 9 oz (2 ¼ sticks) chilled, unsalted butter, cut into ½ inch cubes

  • 8 tablespoons (or more) ice water

  • 1 ½ teaspoons apple cider vinegar

 
*Notes
: I love, love, LOVE this dough. The food processor does most of the work and it comes together in no time. It is also very forgiving, which makes it a great dough for novice bakers. Unlike my flaky pie dough, which requires a bit more work, this is a tender dough--more like a pâte sablé. If you'd like a flakier crust on your galette, feel free to substitute this dough recipe.

brown sugar pumpkin galette on millys-kitchen.com

- This dough can be refrigerated for up to 2 days or placed in a air-tight plastic bag and frozen for up to 2 months. If frozen, thaw the dough in the refrigerator overnight and soften slightly at room temperature before rolling out.

Blend the flour, sugar and salt in a food processor to combine. Add the butter, processing between each addition using on/off turns, until the dough looks like coarse meal. Gradually add the ice water and cider vinegar and process until the dough just comes together. You may need to add more ice water by teaspoonfuls if the dough is dry.  

Turn the dough out onto a large work surface and gather it together into a ball. Do not knead or you risk toughening the dough. Divide the dough in half with a bench scraper or knife. Form each half into a ball and then flatten each ball into a disk about 1 inch thick. Wrap each disk in plastic wrap and chill for at least an hour before rolling. 
 
Makes 2 disks of dough (enough for 2 galettes).


Bay Ice Cream

  • 1 3/4 cups heavy cream

  • 10 black peppercorns (whole)

  • 6 Turkish bay leaves (fresh or dried)

  • 1 cup whole milk

  • 3/4 cup granulated white sugar, divided

  • Pinch fine grain sea salt

  • 4 large egg yolks


*Note: This ice cream will keep for up to a week, though the texture is best on days 1-3. After that it can get a little grainy, especially if you open and close your freezer a lot. 

brown sugar pumpkin galette on millys-kitchen.com

Place the cream and peppercorns in a medium saucepan and place over medium heat. If you’re using fresh bay leaves, slice each into 4 or 5 pieces and add to the pot. If you are using dried bay, crush the leaves a little before adding them to the pot. When the cream comes to a bare simmer, remove the pot from the heat, cover and set aside to steep for 40 minutes. When the cream has infused, pour it through a fine mesh sieve into a small bowl. Discard the bay and peppercorns. 

Prepare an ice bath by filling a large mixing bowl half full of ice and then just covering the ice with cold water.

Return the strained cream to the pot along with the milk, ½ cup of the sugar and salt. Heat over medium heat, stirring occasionally, until the mixture reaches a bare simmer. Do not boil. 

Whisk the egg yolks and remaining ¼ cup sugar together in a medium bowl. Gradually warm the eggs by adding the cream mixture in a thin stream while whisking. Return the egg and cream mixture to the saucepan. Cook over medium-low, stirring constantly with a flexible heatproof spatula (be sure scrape the bottom and corners of the pan so the custard doesn’t scorch) until the mixture coats the back of spoon like this. If you’re more of a technical cook, the custard should register between 170 to 175°F on an instant-read thermometer. Do not let the custard boil or it will break and look grainy. 

Immediately strain the thickened custard through a fine-mesh sieve into a large bowl set over the ice bath and whisk to cool. Transfer the cooled custard to the fridge and chill for at least 6 hours (overnight if possible--the colder your base is, the smoother your ice cream will be). Freeze the custard in an ice cream maker according to the manufacturer’s directions then transfer to an airtight container and place  in the freezer to harden, at least one hour.

Makes about 1 quart.

brown sugar pumpkin galette on millys-kitchen.com

celery root gratin with apple and blue cheese

celery root gratin with apple and blue cheese

Those of you who read last year's post on Thanksgiving know that, until recently, I'd lost touch with this holiday. Several things led to the rift between Thanksgiving and I. I left home for college, then grad school. My grandparents passed away. I spent several years living abroad. The ties to that steadfast notion of “home” from my childhood grew thinner and thinner until one day they were gone. Eroded by time and distance and my own apathy and self-centeredness, I suppose. For a long time, I simply couldn’t be bothered to make much of an effort.

celery root gratin with apple and blue cheese

But as I wrote last year, I've begun to embrace Thanksgiving again. I am married and settled and happy, with friends and family nearby and work that I love. Beau and I are talking about enlarging our own little family. 

I spent my 20s and most of my 30s ping-ponging around the globe, looking for The Thing that would click my life flawlessly into place. I wanted the coolest job. The most enviable husband. A perfectly decorated house with a closet full of the chicest clothes. But of course I’ve finally realized things are perfect right here--in this home I’ve built for myself. It’s far from flawless, but it’s all mine. And it has nothing to do with what I own.

celery root gratin with apple and blue cheese

This is not a new tale, I know. But it makes me happy to think on it. And it makes me particularly happy to look forward to Thanksgiving again. This year, we’ll be attending Friendsgiving at our friends Alex and Kelsey’s house. There will likely be a ridiculous amount of food, far too much wine and hopefully a highly-competitive game of Celebrities afterwards. (I kill at Celebrities. And yes, I’m one of those people when it comes to boardgames. You've been warned.)

celery root gratin with apple and blue cheese

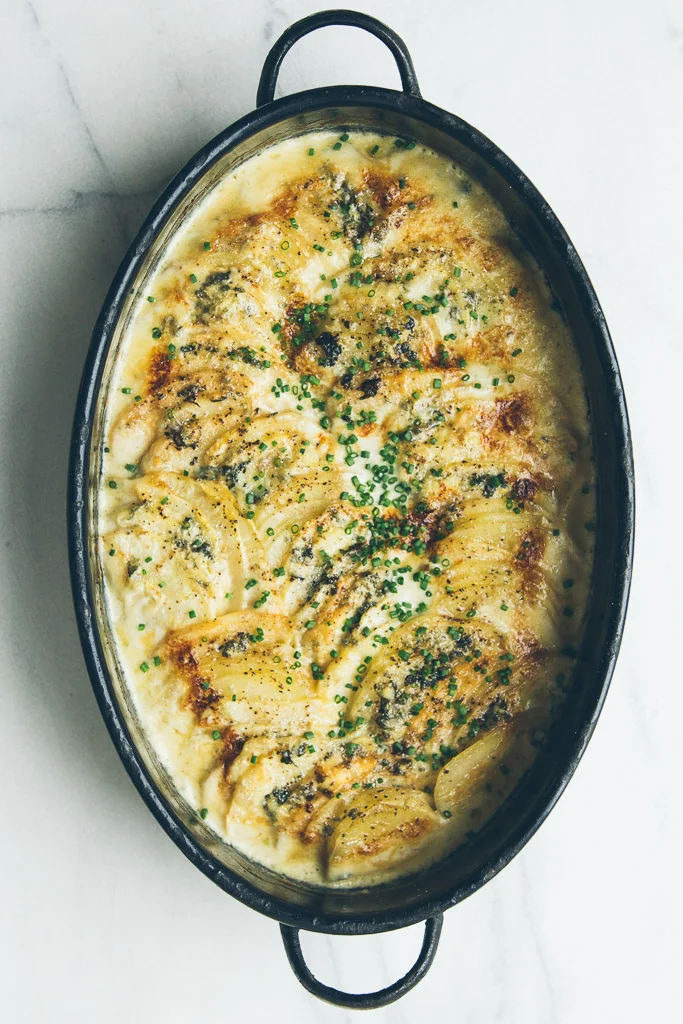
I’m thinking I might bring this Celery Root Gratin with Apple and Blue Cheese to dinner. I always feel like serving this dish is cheating a little though, since it’s virtually impossible for guests not to like it. It’s got thinly sliced potato and earthy celery root, bathed in crème fraîche and baked until meltingly tender. There’s apple for a hint of sweetness and blue cheese adds a savory, salty, umami layer. Emerging from the oven golden and bubbling, this gratin is sexy enough to serve as a vegetarian main. And of course, it plays well with turkey and stuffing and especially tart cranberry sauce. 

As I type this and think about a Thanksgiving full of friends and games and comfort food, I realize I actually can’t wait for next Thursday. This year, it seems I have a little extra something to be thankful for. 


celery root gratin with apple and blue cheese

Celery Root Gratin with Apple and Blue Cheese

  • 1 ¼ to 1 ½ pound celery root, peeled, halved and sliced ⅛ inch thick
  • 1 large russet potato (weighing about 1 lb), peeled, halved and sliced ⅛ inch thick
  • 1 large sweet-tart apple, peeled, cored, quartered and sliced ⅛ inch thick
  • Coarse salt and freshly-ground pepper
  • 1 1/2 cups crème fraîche
  • 6 ounces blue cheese
  • 1 tablespoon finely chopped chives

*Notes: If you haven’t worked with celery root (also called celeriac) before, note that they have a gnarled root end that is almost always full of dirt and will have to be cut off completely. I call for a 1 ¼ to 1 ½ pound celery root to make up for lost root end. Once your celery root is cleaned, it should weigh somewhere between 14 oz and 1 lb. But a gratin is a very accommodating thing; a little more or less celery root, potato or apple won’t hurt anything.

- You can make this in a 13 x 9-inch baking dish if you like. The gratin will be thinner and there will be more of the crispy, golden-brown top to go around. This is an especially good option if you’re going to serve the gratin as part of a holiday buffet for a lot of people. I prefer to make it in a smaller roasting pan (the one pictured measures 8 x 12 inches), which yields thicker slices. 

- This dish has always been a crowd-pleaser for me and I’ve had many sworn blue cheese haters ask for seconds. If you’re serving this to anyone who claims to dislike blue cheese (!), I have two recommendations: First, use a mild, creamy and salty blue cheese rather than a dryer, more pungent one. I recommend Fourme d’Ambert or Bleu d’Auvergne. These two French blues are delicious, fairly mild and have the added bonus of being inexpensive as far as cheeses go. A second, sneakier, option is to fail to mention that the gratin contains blue cheese. A lot of people never even realize it's there.

- If you really, REALLY hate blue cheese, just substitute another sharp, salty cheese. Sharp white cheddar or an aged gruyère would be delicious.

2015_11_Celery Root Gratin-3.jpg

Preheat the oven to 400°F and generously butter a medium baking dish or roasting pan. Arrange half of the celery root, potato and apple slices in the pan. For this first layer, you don’t need to arrange the slices very artfully as they won’t be seen, just be sure to distribute them evenly over the bottom so each bite contains some celery root, apple and potato. Generously salt and pepper this layer. Stir the  crème fraîche to loosen the consistency then pour half over the top. Spread it to the edges with a flexible spatula, if necessary. Crumble half the blue cheese over the crème fraîche.

For the top layer, neatly arrange the slices of celery root, potato and apple, overlapping them as necessary to fit them in your pan. Generously salt and pepper this layer then cover with the remaining crème fraîche and blue cheese.

Bake the gratin for 20 minutes then cover with aluminum foil and bake until the potatoes are tender (they take the longest to cook through), about 30 minutes more. Check for doneness with a paring knife; you should feel almost no resistance when you insert the knife into the gratin. Take off the aluminum foil and continue to bake until the top is deep golden brown, about 15 minutes longer. Remove the gratin from the oven and let rest for 10-15 minutes. Sprinkle with chopped chives just before serving. 

Makes about 6 servings.

celery root gratin with apple and blue cheese

pastéis de tentúgal

Pastéis de Tentúgal // crispy, buttery Portuguese pastries filled with egg custard

Pastéis de Tentúgal are Portuguese pastries that originated in Tentúgal, a tiny town halfway between Lisbon and Porto. These pastéis, invented by Carmelite nuns in the 16th century, are packets of thin, flaky pastry filled with a rich egg custard and dusted with powdered sugar.

I have to be honest though; I’ve never set foot in Tentúgal. I tasted these pastries at a traditional desserts workshop that was part of my Portugal culinary tour. They were crispy and buttery and eggy and just the right amount sweet. They immediately became my favorite new food discovery.

Pastéis de Tentúgal // crispy, buttery Portuguese pastries filled with egg custard

I also love the history of these egg-based confections:

After colonizing Brazil and Madeira in the 16th century, Portugal began importing a steady stream of sugar (formerly a luxury destined only for the wealthy) from their plantations abroad. At this time, there happened to also be a large number of convents in Portugal using egg whites to starch their habits. All those elaborately starched wimples meant a lot of nuns with a lot of extra egg yolks on their hands. One of those nuns had the brilliant idea of combining the surplus egg yolks with the newly abundant sugar, and the classic eggy, sweet Portuguese convent pastry was born! 

Pastéis de Tentúgal // crispy, buttery Portuguese pastries filled with egg custard

I like to imagine the sisters working away in their convent kitchens, inventing new confections to use up their stockpile of yolks and dreaming up names for their heavenly creations: barrigas de freira (nun’s bellies), toucinho do céu (bacon from heaven), papos de anjo (angel cheeks or angel breasts, depending on who you ask). 

The Carmelites were especially inventive in dreaming up the Pastéis de Tentúgal. It seems that in addition to egg yolks, the sisters had a lot of time on their hands because the traditional version of the sweet involves hand-stretching a gigantic disk of dough into paper-thin sheets that are rolled around doce de ovos (a sort of egg and sugar custard) and baked.

Pastéis de Tentúgal // crispy, buttery Portuguese pastries filled with egg custard

I am certain that the traditional version with it’s miraculously thin pastry case is divine. But since the chances of me learning to make this super labor-intensive dough from those who hold the secret recipe are slim, and the chances of you deciding to make it at home are even slimmer, I’m going to share the version of the recipe I learned, which relies on phyllo dough for the pastry case. I hope that's alright with you. :)

Pastéis de Tentúgal // crispy, buttery Portuguese pastries filled with egg custard

I learned to make this version of Pastéis de Tentúgal from chef Orlanda Monteiro. Once you get the hang of working with the phyllo and learn how not to overfill your pastries (which I definitely did in my first batch), these are remarkably easy to make. 

And the results are stellar. The finished pastries stand on their contrasts; the shatteringly crisp shell houses a creamy egg filling that is both rich and airy. Which means you could eat about a dozen of them. Or I could anyway. My official testers (my mother and the baristas at my favorite coffee shop) gave these an enthusiastic thumbs up. I hope you will, too.

As always, if you have any questions about technique or ingredients (or if you just want to to let the world know what you think of this recipe!), give a shout-out in the comments below. 

Pastéis de Tentúgal // crispy, buttery Portuguese pastries filled with egg custard

Pastéis de Tentúgal // crispy, buttery Portuguese pastries filled with egg custard
Pastéis de Tentúgal
Pastéis de Tentúgal

  • 11 oz (generous 1 ½ cups) granulated sugar
  • 1 cup water
  • 10 large egg yolks
  • 12 sheets phyllo dough (you might need one or two extra if any of your sheets tear)
  • 4 oz (8 tablespoons) unsalted butter, melted

*Notes: For best results, thaw your phyllo dough overnight in the fridge. To keep it from drying out, I cover the phyllo dough I’m not working with at the moment with a sheet of plastic wrap and then a barely damp dish towel.

- If you overfill your pastries, they will burst in the oven. The key is to only use one tablespoon of filling per pastry then to roll them loosely. Finally, when you turn the edges up, leave about ½ inch empty space on each side of the filling. Leaving a little extra room inside the pastry allows the egg filling to expand without leaking.

- Egg whites (unlike yolks) freeze beautifully. If you want to use them later to make meringue, be sure to separate your eggs carefully and avoid getting any yolk in the whites. To thaw, place the frozen egg whites in the fridge overnight.

- Like many Portuguese pastries, these are especially good straight out of the oven, served with an espresso.

Pastéis de Tentúgal // crispy, buttery Portuguese pastries filled with egg custard

Combine the sugar and water in a medium saucepan. Bring to a boil over medium-high heat. Once the sugar is dissolved, do not stir the syrup. Cook until the syrup has thickened enough to come off a spoon in a thick stream. This should take about 8-10 minutes. If you want to be more precise, the syrup should read about 200°F on an instant-read thermometer. Set aside to cool for a minute or two.

While the syrup is cooling, place your yolks in a large bowl. Whisk to combine then slowly drizzle in a very thin stream of the hot syrup, whisking constantly. The idea is to temper your eggs, or gradually heat them enough to add them to the hot liquid without scrambling them. Continue to gradually add the syrup while whisking vigorously. The more your eggs warm up, the faster you can add the syrup. When you’ve added all the syrup, transfer the egg mixture back to the saucepan and place over medium-low heat. Cook, stirring or whisking constantly until the mixture is thick and creamy and resembles sabayon or lemon curd. Whisking is faster and yields a fluffier result, so that’s the method I prefer. Either way, be sure to occasionally scrape the bottom and corners of the pan with a flexible, heat-proof spatula to make sure there’s no egg scorching going on down there.

Pastéis de Tentúgal // crispy, buttery Portuguese pastries filled with egg custard

Remove from the heat and strain the egg mixture through a medium-mesh sieve into a medium bowl (the sieve will remove any little bits of hard-cooked egg and make sure your filling is smooth). Place a sheet of plastic wrap directly on the surface of the egg custard (to prevent a skin from forming) and refrigerate until set, at least 2 hours and up to 2 days.

When you’re ready to assemble and bake the pastéis, preheat your oven to 400°F.  

Stack two sheets of phyllo on a large, clean work surface. Fold the stacked sheets in half widthwise (short end to short end) and cut along the fold with sharp knife. Stack the four sheets of phyllo on top of each other, fold widthwise and cut along the fold again. You will now have eight rectangles of phyllo dough measuring roughly 7x9 inches. Place six of the sheets under your towel with the rest of the phyllo and leave two on your work surface.

Pastéis de Tentúgal // crispy, buttery Portuguese pastries filled with egg custard

Using a pastry brush, lightly butter the first rectangle of phyllo. Place the second sheet directly on top and lightly butter as well. Position the phyllo sheets so one of the long edges is closest to you, then place one tablespoon of the chilled egg filling in the middle of this long edge, about ¾ inch in from the edge. Loosely fold the phyllo over the filling to create a sort of flat tube (it will puff as it cooks). Use your fingers to make an indentation on both sides of the filling, leaving about ½ inch room for the filling to expand within the tube. Brush the top of the pastry with butter, fold the ends up, pinching the seam gently so they won’t open in the oven and butter the ends you’ve just folded up. Place on a parchment-lined sheet pan and repeat with the rest of the phyllo and filling.

Bake the pastéis for 12-14 minutes, until they have puffed and the tops are golden brown. Cool slightly before sprinkling with powdered sugar. The pastéis can be served warm or at room temperature.

Pastéis de Tentúgal // crispy, buttery Portuguese pastries filled with egg custard