vegan

a perfect pot of beans

Image: Olaiya Land

There’s a special pleasure to be had in doing a simple thing well. In taking the time to do it slowly and properly then standing back to admire your work.

The sort of things I’m thinking of have an old-fashioned, almost Victorian air about them: making a bed with crisp hospital corners. Polishing a tray of silver until it sings. Mowing the lawn into bright green zig zags. 

Image: Olaiya Land

I am a lover of all these sorts of tasks--shelling peas, ironing laundry, organizing books on a shelf. This might be because my personality veers towards the OCD end of the spectrum. Or it might be because these sort of activities pull me away from the constant pinging of my phone and the flashing notifications on my computer screen and my general hurried busy-ness. They allow me to concentrate fully on what’s in front of me, which feels like a small luxury these days.

One such task I would place on this list is cooking a perfect pot of beans. 

Image: Olaiya Land
Image: Olaiya Land

Given the current fascination with foods like bee pollen, dragon fruit, active charcoal and cashew milk, beans don’t exactly sound like the sexiest of ingredients. But I have a hunch this is due largely to the fact that many (most?) people don’t know how to cook dry beans properly.

(Don’t worry--I’m not going to go on a rant about how you should become an urban homesteader and start making everything from scratch. I appreciate the convenience of popping open a can of beans on a Tuesday night.) 

Image: Olaiya Land
Image: Olaiya Land

That said, a warm bowl of freshly cooked beans tossed with olive oil, salt and a splash of lemon juice--maybe a handful of herbs if we’re feeling fancy--is a very fine thing. Forget the bland mushiness of canned beans. Home-cooked beans have a firm skin, silky interior and their own distinct flavors. Bonus points: they're cheap and super healthy. All of which is why I want you to give cooking your own beans a try.

If you haven’t had luck with cooking your own beans or have forgotten how easy it can be, I've got a step-by-step guide for you below on how to prepare perfectly flavorful and not-even-a-little-bit-mushy beans every time. 

And when you've cooked up your perfect pot of beans, don't forget to sit back and savor a job well done.

XO,

Olaiya


How to Cook a Perfect Pot of Beans

1. Buy good beans.  Beans might be a humble ingredient, but buying quality pays off in the pot. The sort of beans you get in a 2-lb. bag at a large chain grocery store might have been harvested as much as 5 (!!!) years ago. Which means they will be less flavorful and won't cook as evenly. As with most things, fresher is better. You want beans that were harvested this year or last (depending on the time of year). How do you know you're getting fresh beans? But them from someone who specializes in (and loves) beans! My two favorite sources are Zursun Heirloom Beans and Rancho Gordo. Both of these growers specialize in bringing a variety of heirloom beans to a wider audience. If you haven't tried these beans before, they will change your life. 

2. Soak your beans.  I know there are all sorts of tips and tricks floating around on the internet for cooking your beans without soaking them. And I'm sure lots of those work in a pinch. But for tender, evenly cooked beans that don't fall apart or get mushy, I've found that the only way to go is an overnight soak. You want to hit at least 6 hours. For denser beans (like chickpeas) and larger beans (like corona beans or gigantes) I aim for a 24-hour soak (or as close as I can get) to make sure they're fully and evenly hydrated before cooking.

How to: Place your dried beans in a large bowl and cover them with cold water. Your beans will usually double in size as they soak, so make sure you cover them with enough water to allow them to expand. If your kitchen is hot or if you're soaking for longer than 8 hours, place the beans in the fridge to hydrate.

3. Drain your beans before cooking.  Unless, of course, you love to fart. Beans contain carbohydrates called oligosaccharides, which are poorly absorbed in the stomach and then rapidly fermented by bacteria in the large intestine, causing gas. Some of these oligosaccharides are released into the water as beans soak. So pouring off that water reduces the amount of pesky oligosaccharides hanging out ready to ruin your next date or team meeting. I have been doing this for years and beans almost never give me any sort of gut problems.

How to: Drain your soaked beans in a colander and rinse them under cold running water for 15-30 seconds.

4. Season your cooking water well.  It hurts my soul when I see someone chuck a bunch of soaked beans into a pot with nothing else but water and start cooking them. Like any other ingredient, beans need a little help to release their full flavor. I usually season my beans with olive oil, a ton of garlic, a couple bay leaves and often a chile of some sort. And salt. DO NOT FORGET THE SALT. You don't want to salt the water as heavily as you would for pasta or green vegetables because the beans soak up a lot more water than the former and will get too salty if you do. I salt my water until it tastes just a tiny bit briny. You want to taste that salt is present, but you don't want the water to taste noticeably salty. 

How to: Place your soaked, rinsed beans in a large heavy-bottomed stock pot or Dutch oven. Add enough water so that the beans are covered by 2-3 inches. Salt the water as instructed above. Add lots of garlic--at least 4 cloves. I usually use 6 to 8. No need to chop them, just smash them with the side of a large knife, remove the skins and toss them in. Add a nice glug of olive oil, 2 bay leaves and a dried chile if you want to. I like árbol chiles. 

Variations: Use more garlic or less. If you are making Mexican beans, you can sub avocado leaves for the bay and add a cinnamon stick and a smokier chile (this is especially good with black beans). Or you can add a bundle of cilantro stems along with the bay, garlic and chile. If you want Greek flavors, sub in a few stems of dried oregano. For French flavors, use thyme or a bouquet garni. For Italian flavors, rosemary. (If you're using fresh herbs, I recommend tying them in cheesecloth, so they don't disintegrate into little black flecks in your beans.) Add large strips of orange or lemon zest cut with a vegetable peeler. The options are almost limitless.

Image: Olaiya Land

5. Cook your beans gently.  Beans cooked at a rolling boil, bounce around which breaks their skins causing them to get mushy. To get whole, tender beans, cook them at a simmer.

How to: Bring your beans and seasoned water to a boil over high heat, reduce the heat to medium-low. Skim any foam that forms on the surface of the water and discard. Cover and cook until the beans are done, adjusting the heat to keep the water at a bare, bare simmer. 

6. Use a pressure cooker (optional). My mother-in-law gave me this pressure cooker several Christmases ago and I LOVE it. I'm thinking an Instant Pot would work just as well if you've got one of those. Pressure cooking makes the very best beans in my opinion. The only caveat is that the cook times listed in the manual are often for commercial beans and are too long for heirloom beans which are generally fresher and cook more quickly. When I'm trying a new bean I haven't cooked before, I take 2-3 minutes off the listed cook time. If the beans aren't done, I just put the pot back on the stove and finish the beans without the lid. 

7. Cook your beans longer than you think.  This one is counter intuitive since we don't want our beans to be mushy. But beans will firm up a little bit as they sit. So I always cook my beans just a bit past the firmness I'm looking for. The key is to LET YOUR BEANS COOL IN THEIR COOKING WATER. If you turn them into a colander, they will smash each other and all your careful bean-cooking effort will be wasted. 

How to: Once your beans are just slightly past the doneness you want, slide the whole pot to a burner that's not in use or a cooling rack and let the beans cool to room temperature before you spoon or ladle them to storage containers (never pour). If you need them sooner, use a slotted spoon to carefully lift them out of their cooking water. 

8. Store them properly. Store your beans in a covered container in the fridge. Beans keep longer if you store them in their cooking water. I find they keep up to a week that way. You can also freeze them. Place them in a freezer-proof container, cover them with their cooking water and be sure to leave headspace at the top of the jar so the liquid can expand as it freezes. Thaw in the fridge overnight. And hold onto that cooking water! It's like gold in the kitchen. You can freeze it and use it as you would vegetable or chicken stock. It's super flavorful and it's basically free.

9. Eat your delicious beans.  In case you need some ideas for what to do with your delicious home cooked beans, here are some recipes from the blog:

huevos rancheros with black beans and salsa verde
roast leg of lamb with cilantro-pistachio pesto and white bean puree
smoky tomato broth with masa dumplings and black beans
lemony parsnip and white bean soup


Feel free to reach out in the comments below if you have any questions or tips to add to this list!


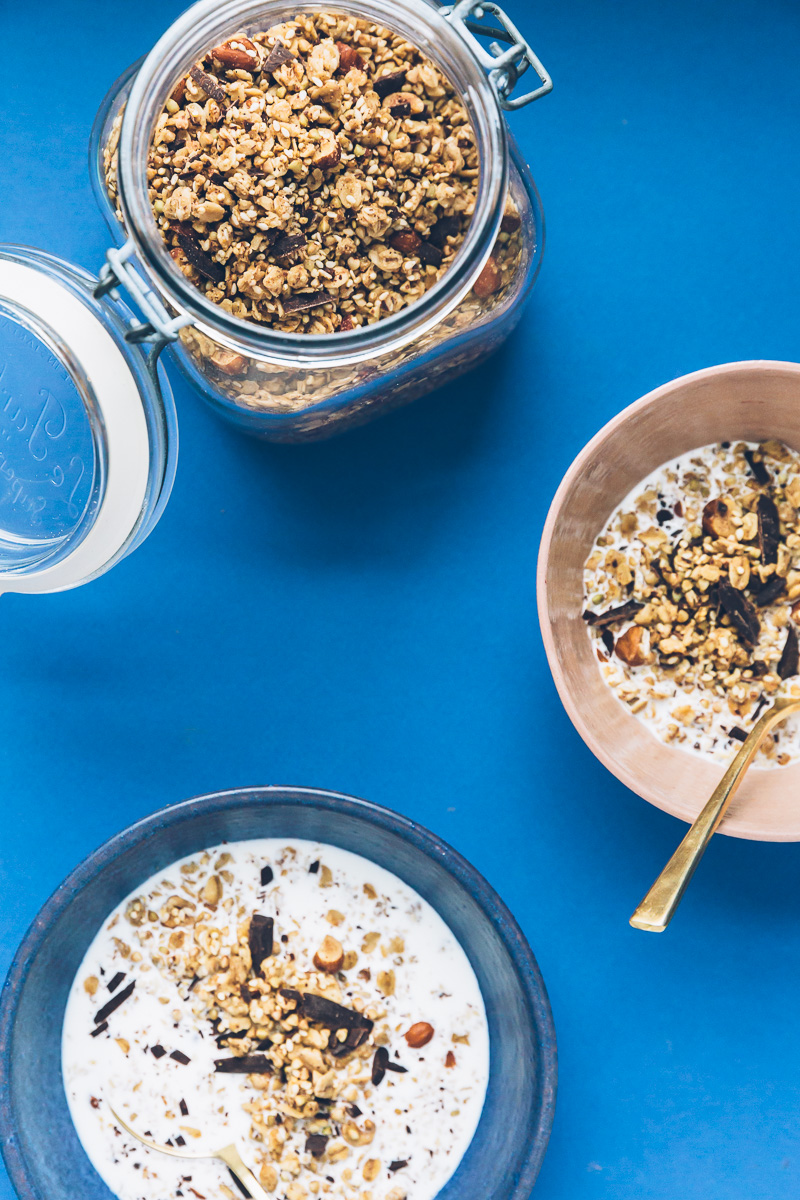
toasted buckwheat granola with tahini and dark chocolate

Buckwheat Granola with Tahini and Dark Chocolate // Image: Olaiya Land

Hello people!

Today’s the day! It's the final post in the holiday blognanza I put together for you with Megan from Cream + Honey! In case you missed them, you can check out our previous posts here:

Every year, I like to share an easy last-minute edible holiday gift recipe with you. This year, I’ve got this Buckwheat Granola with Tahini and Dark Chocolate. This one goes out to all the procrastinators among us (including myself) who are scrambling for a last-minute homemade gift idea. And to all you overachievers who want to spread a little extra holiday cheer! Whichever camp you fall into, you most definitely need to make this granola.

Buckwheat Granola with Tahini and Dark Chocolate // Image: Olaiya Land

In an effort to switch things up this year, I dialed back the oats in my go-to granola formula and decided to throw in a generous amount of lightly toasted buckwheat groats. This turned out to be a pretty good move on my part (thank you Alison Roman for the inspiration) because the buckwheat lent an earthy complexity to this granola and made it extra crunchy and sog-proof. 

I hate getting hungry halfway through my morning, so to make this more filling, I added protein-packed quinoa to the mix. I’ve got hazelnuts in there too because, duh, I AM OBSESSED WITH HAZELNUTS. (I might lay off the hazelnuts in the new year. Can’t make any promises though…). 

Lastly, I’ll admit that the super sexy tahini + dark chocolate combo could be considered showboating (mostly by people who eat bran flakes for breakfast). In my defense, however, it elevates this way beyond your basic bulk-bin affair and turns it into the sort of granola your brunch guests will ooh! and ah! about and your children will fight over. (Don’t blame me, blame the chocolate.)

Buckwheat Granola with Tahini and Dark Chocolate // Image: Olaiya Land

This takes about 15 minutes of active time plus 50 minutes in the oven, which gives you just enough time to whip up a batch of Megan’s Amaro Sprtiz Punch and kick the holiday weekend off in boozy style!

I myself will most likely be subsisting on handfuls of this granola over the next 48 hours as I attempt to distribute the last of my holiday baked goods, prep the house for our AirBnB guests (so nerve racking!) and pack my bags for Paris.

Buckwheat Granola with Tahini and Dark Chocolate // Image: Olaiya Land

I’m not sure if I’ll have time to post before the new year, so I’ll take this opportunity to tell you how immensely grateful I am to all of you who joined my workshops, followed my adventures on Instagram and stopped by to read this blog. Thank you, thank you, THANK YOU! Your kindness and support over the past year mean so much to me. 

I wish you a beautiful, restful and delicious holiday and I can’t wait to see you in 2018!

XOXO!

Olaiya


Toasted Buckwheat Granola with Tahini and Dark Chocolate

  • ¼ cup sugar
  • ½ vanilla bean
  • 2 cups raw buckwheat groats
  • 3 cups rolled oats (not instant)
  • 1 cup raw hulled sesame seeds
  • 1 cup raw hazelnuts, roughly chopped
  • ½ cup uncooked quinoa
  • 1 teaspoon ground cardamom
  • 1 teaspoon coarse salt
  • ¼ cup avocado oil, refined coconut oil (or other neutral-tasting oil)
  • ¼ cup extra-virgin olive oil
  • 2 tablespoons maple syrup
  • ¼ cup rice bran syrup or agave
  • 6 tablespoons tahini
  • 1 cup (4 oz) shaved dark chocolate (I used Callebaut 60%)

*Note: There are two kinds of buckwheat groats--raw (or lightly toasted) and darkly toasted (also known as kasha). For this recipe you want raw or lightly toasted buckwheat groats since they're going in the oven for quite a while. These will be green or light brown and shouldn't have much of a scent to them. It's pretty easy to distinguish from kasha which is dark brown or reddish brown and has a nutty, toasted smell to it. If you can't find raw buckwheat groats where you live, feel free to substitute more oats or a mix of other dry ingredients like flax seeds, raw sunflower seeds, spelt flakes, etc.


Buckwheat Granola with Tahini and Dark Chocolate // Image: Olaiya Land

Preheat your oven to 300° F.

Place the sugar in a small bowl. Using a paring knife, split the vanilla bean lengthwise and use the sharp edge of the knife to scrape the seeds from the pod. Add the seeds to the sugar and use your fingers to rub the vanilla into the sugar, breaking up any clumps. Place the buckwheat, oats, sesame seeds, hazelnuts, quinoa, cardamom and salt in a large bowl. Add the vanilla sugar and stir to combine thoroughly.

Combine the oils, syrups and tahini in a medium bowl and whisk well to combine. Pour the wet ingredients over the dry ingredients and stir until all the dry ingredients are completely coated.

Divide the granola between two parchment-lined sheet pans. Spread the granola out and place the pans in the oven. Bake for 50-60 minutes, rotating the pans and stirring the granola every 15 minutes or so. You want to remove the granola from the oven when it's golden brown. Don't worry if it's not completely dry; it will crisp up as it sits. Place the sheet pans on wire racks to cool. When the granola is completely cool, stir in the shaved chocolate. 

Transfer the granola to an airtight container (I like a big mason jar) and store in a cool dry place. Tightly covered, the granola will keep for several weeks.

Buckwheat Granola with Tahini and Dark Chocolate // Image: Olaiya Land

smoky calendula margaritas

image: Olaiya Land
image: Olaiya Land

I just got back from five sun-soaked days in Palm Springs. Five days during which, per our tradition, I ditched my devices, hiked, swam, sunned myself and got what felt like a luxurious amount of sleep. 

All that sleep and sunshine and time away from my computer and phone did something magical to my brain. It afforded me the time and perspective to think. Not about laundry and bills and the rising tide of emails in my inbox as I do in my normal life. But really think--about the bigger picture of my relationships and my work and whether I like the direction things are going. Mostly I do. But I discovered that in a few areas (many related to this blog) I definitely do not. With a little distance and space to connect with myself, I realized I’ve started to feel like a phony in my online existence.

image: Olaiya Land
image: Olaiya Land

For the past several months, I’ve lost my lifelong joy in cooking. I’m constantly thinking about whether recipes will look good on the blog and on instagram, whether people will actually make them, how difficult they’ll be to shoot--instead of simply what I want to eat. My photography, too, has felt staid and unsatisfying. I feel like it’s become sort of advertorial and aggressively pretty as I’ve been prioritizing turning this space into a full-blown business and growing the blog and my followers on social media. My Instagram feed, the victim of too many online marketing classes, has started to feel impersonal and rigidly formulaic. The whole shebang had started to feel like a rather unfulfilling slog. 

And that, friends, is no good. 

image: Olaiya Land
image: Olaiya Land

I recently read a post by a woman I follow, who’d decided to take a six-month break from Instagram in order to focus on herself and being a better mom, wife and friend. I found it immensely encouraging to hear about someone else’s struggles with the social media monster. It made me feel I’m not the only one unnerved by my constant desire to find Instagrammable moments rather than be present. 

So it feels important to tell you all about how I’ve been feeling and publicly announce my intentions to keep things a little more real around here. I think it will keep me more accountable (thank you!) and I hope it will help anyone else wrestling with similar demons.

image: Olaiya Land
image: Olaiya Land

For these reasons, and because I just need this space to feel fun again, I’ve decided to scrap all the advice I’ve accumulated over the past 2 ½ years on how to grow your blog/social media following/online business that doesn’t feel like me. If it feels like an opportunity to grow my skills that will push me outside my comfort zone (like the Oaxaca photography workshop I took), that’s one thing. If it feels cheesy and inauthentic, it’s a no-go. 

I don’t care if posts featuring cakes and cookies and ice cream get more likes. I don’t eat those things very often. I don’t care if the prevailing theory of social media is that you should have a highly-curated feed with lots of negative space and a unified “color story”. I want to post what I find beautiful and what makes me happy, in whatever order I feel like. In general, I want less pretty and more real.

image: Olaiya Land
image: Olaiya Land
image: Olaiya Land

To that end, I plan to free myself from the vice-grip of social media. I want to work on developing a photographic style that feels truer to myself. This week I started reading cookbooks for fun again and choosing recipes that appeal to nothing but my own whims and fancies. It was fantastic. 

I want to focus on the parts of my job that bring me real joy: Travel. Leading retreats and workshops. Meeting and collaborating with new folks. Getting people jazzed and confident to cook for themselves and people they love. 

image: Olaiya Land

Connecting with other people and encouraging them to do the same is what gives me the most energy--not learning about SEO or fretting over my social media feeds. This realization feels incredibly liberating, like it deserves a little celebration. So this week, I made some desert-inspired Smoky Calendula Margaritas and toasted my new-found freedom. I feel like a huge weight has been lifted. And that’s definitely something worth raising a glass to.


Smoky Calendula Margaritas

  • 2 tablespoons calendula petals + additional to serve
  • ¼ cup flaky salt (I used Maldon)
  • ½ cup mezcal
  • ¼ cup calendula simple syrup (see recipe below)
  • ¼ cup freshly-squeezed lime juice
  • ¼ cup freshly-squeezed orange juice
  • Lime wedges, to serve

*Notes: I learned on my trip to Oaxaca that the best quality mezcal is clear, not amber. Do yourself a favor and track down some quality mezcal for these margaritas. I learned the hard way that cheap mezcal is not your friend. If you want to wake up without a killer hangover, buy good mezcal

- You can buy calendula petals online or from an herbalist or health food store. I bought mine at Rainbow Natural Remedies here in Seattle. Marigold petals will also work. If they come as full flower heads, remove the petals from the stems before proceeding.

image: Olaiya Land

To make calendula salt: place 2 tablespoons of the calendula petals in a spice grinder and pulse until roughly chopped (you can also do this in a mortar and pestle or molcajete). Transfer to small and bowl and add the salt. Stir to combine and set aside. Stored in an airtight container, the calendula salt will keep indefinitely.)

To make the margaritas: Pour some of the calendula simple syrup into a small plate with a lip. Transfer the calendula salt to a similar plate. Dip the rim of 2 8-oz cocktail glasses into the simple syrup then place the rims of the glasses in the calendula salt and turn to coat evenly. Set aside. 

In a cocktail shaker, combine the mezcal, calendula simple syrup, lime juice, orange juice and a pinch of calendula petals and shake vigorously over ice for 30 seconds. Pour into the prepared glasses. Top with more ice if necessary. Garnish with a lime wedges and serve.

Makes 2 drinks.


Calendula Simple Syrup

  • 1 cup sugar

  • 1 cup dried calendula petals

Place the sugar, calendula petals and 1 cup water in a medium saucepan. Bring to the boil over high heat, stirring occasionally to dissolve the sugar. 

Remove from the heat and set aside to steep for at least 30 minutes, and preferably for an hour or two. Strain through a fine mesh sieve, pressing on the solids to remove as much syrup as possible. Transfer to an airtight container and store in the refrigerator for up to 2 weeks.