winter

pastéis de tentúgal

Pastéis de Tentúgal // crispy, buttery Portuguese pastries filled with egg custard

Pastéis de Tentúgal are Portuguese pastries that originated in Tentúgal, a tiny town halfway between Lisbon and Porto. These pastéis, invented by Carmelite nuns in the 16th century, are packets of thin, flaky pastry filled with a rich egg custard and dusted with powdered sugar.

I have to be honest though; I’ve never set foot in Tentúgal. I tasted these pastries at a traditional desserts workshop that was part of my Portugal culinary tour. They were crispy and buttery and eggy and just the right amount sweet. They immediately became my favorite new food discovery.

Pastéis de Tentúgal // crispy, buttery Portuguese pastries filled with egg custard

I also love the history of these egg-based confections:

After colonizing Brazil and Madeira in the 16th century, Portugal began importing a steady stream of sugar (formerly a luxury destined only for the wealthy) from their plantations abroad. At this time, there happened to also be a large number of convents in Portugal using egg whites to starch their habits. All those elaborately starched wimples meant a lot of nuns with a lot of extra egg yolks on their hands. One of those nuns had the brilliant idea of combining the surplus egg yolks with the newly abundant sugar, and the classic eggy, sweet Portuguese convent pastry was born! 

Pastéis de Tentúgal // crispy, buttery Portuguese pastries filled with egg custard

I like to imagine the sisters working away in their convent kitchens, inventing new confections to use up their stockpile of yolks and dreaming up names for their heavenly creations: barrigas de freira (nun’s bellies), toucinho do céu (bacon from heaven), papos de anjo (angel cheeks or angel breasts, depending on who you ask). 

The Carmelites were especially inventive in dreaming up the Pastéis de Tentúgal. It seems that in addition to egg yolks, the sisters had a lot of time on their hands because the traditional version of the sweet involves hand-stretching a gigantic disk of dough into paper-thin sheets that are rolled around doce de ovos (a sort of egg and sugar custard) and baked.

Pastéis de Tentúgal // crispy, buttery Portuguese pastries filled with egg custard

I am certain that the traditional version with it’s miraculously thin pastry case is divine. But since the chances of me learning to make this super labor-intensive dough from those who hold the secret recipe are slim, and the chances of you deciding to make it at home are even slimmer, I’m going to share the version of the recipe I learned, which relies on phyllo dough for the pastry case. I hope that's alright with you. :)

Pastéis de Tentúgal // crispy, buttery Portuguese pastries filled with egg custard

I learned to make this version of Pastéis de Tentúgal from chef Orlanda Monteiro. Once you get the hang of working with the phyllo and learn how not to overfill your pastries (which I definitely did in my first batch), these are remarkably easy to make. 

And the results are stellar. The finished pastries stand on their contrasts; the shatteringly crisp shell houses a creamy egg filling that is both rich and airy. Which means you could eat about a dozen of them. Or I could anyway. My official testers (my mother and the baristas at my favorite coffee shop) gave these an enthusiastic thumbs up. I hope you will, too.

As always, if you have any questions about technique or ingredients (or if you just want to to let the world know what you think of this recipe!), give a shout-out in the comments below. 

Pastéis de Tentúgal // crispy, buttery Portuguese pastries filled with egg custard

Pastéis de Tentúgal // crispy, buttery Portuguese pastries filled with egg custard
Pastéis de Tentúgal
Pastéis de Tentúgal

  • 11 oz (generous 1 ½ cups) granulated sugar
  • 1 cup water
  • 10 large egg yolks
  • 12 sheets phyllo dough (you might need one or two extra if any of your sheets tear)
  • 4 oz (8 tablespoons) unsalted butter, melted

*Notes: For best results, thaw your phyllo dough overnight in the fridge. To keep it from drying out, I cover the phyllo dough I’m not working with at the moment with a sheet of plastic wrap and then a barely damp dish towel.

- If you overfill your pastries, they will burst in the oven. The key is to only use one tablespoon of filling per pastry then to roll them loosely. Finally, when you turn the edges up, leave about ½ inch empty space on each side of the filling. Leaving a little extra room inside the pastry allows the egg filling to expand without leaking.

- Egg whites (unlike yolks) freeze beautifully. If you want to use them later to make meringue, be sure to separate your eggs carefully and avoid getting any yolk in the whites. To thaw, place the frozen egg whites in the fridge overnight.

- Like many Portuguese pastries, these are especially good straight out of the oven, served with an espresso.

Pastéis de Tentúgal // crispy, buttery Portuguese pastries filled with egg custard

Combine the sugar and water in a medium saucepan. Bring to a boil over medium-high heat. Once the sugar is dissolved, do not stir the syrup. Cook until the syrup has thickened enough to come off a spoon in a thick stream. This should take about 8-10 minutes. If you want to be more precise, the syrup should read about 200°F on an instant-read thermometer. Set aside to cool for a minute or two.

While the syrup is cooling, place your yolks in a large bowl. Whisk to combine then slowly drizzle in a very thin stream of the hot syrup, whisking constantly. The idea is to temper your eggs, or gradually heat them enough to add them to the hot liquid without scrambling them. Continue to gradually add the syrup while whisking vigorously. The more your eggs warm up, the faster you can add the syrup. When you’ve added all the syrup, transfer the egg mixture back to the saucepan and place over medium-low heat. Cook, stirring or whisking constantly until the mixture is thick and creamy and resembles sabayon or lemon curd. Whisking is faster and yields a fluffier result, so that’s the method I prefer. Either way, be sure to occasionally scrape the bottom and corners of the pan with a flexible, heat-proof spatula to make sure there’s no egg scorching going on down there.

Pastéis de Tentúgal // crispy, buttery Portuguese pastries filled with egg custard

Remove from the heat and strain the egg mixture through a medium-mesh sieve into a medium bowl (the sieve will remove any little bits of hard-cooked egg and make sure your filling is smooth). Place a sheet of plastic wrap directly on the surface of the egg custard (to prevent a skin from forming) and refrigerate until set, at least 2 hours and up to 2 days.

When you’re ready to assemble and bake the pastéis, preheat your oven to 400°F.  

Stack two sheets of phyllo on a large, clean work surface. Fold the stacked sheets in half widthwise (short end to short end) and cut along the fold with sharp knife. Stack the four sheets of phyllo on top of each other, fold widthwise and cut along the fold again. You will now have eight rectangles of phyllo dough measuring roughly 7x9 inches. Place six of the sheets under your towel with the rest of the phyllo and leave two on your work surface.

Pastéis de Tentúgal // crispy, buttery Portuguese pastries filled with egg custard

Using a pastry brush, lightly butter the first rectangle of phyllo. Place the second sheet directly on top and lightly butter as well. Position the phyllo sheets so one of the long edges is closest to you, then place one tablespoon of the chilled egg filling in the middle of this long edge, about ¾ inch in from the edge. Loosely fold the phyllo over the filling to create a sort of flat tube (it will puff as it cooks). Use your fingers to make an indentation on both sides of the filling, leaving about ½ inch room for the filling to expand within the tube. Brush the top of the pastry with butter, fold the ends up, pinching the seam gently so they won’t open in the oven and butter the ends you’ve just folded up. Place on a parchment-lined sheet pan and repeat with the rest of the phyllo and filling.

Bake the pastéis for 12-14 minutes, until they have puffed and the tops are golden brown. Cool slightly before sprinkling with powdered sugar. The pastéis can be served warm or at room temperature.

Pastéis de Tentúgal // crispy, buttery Portuguese pastries filled with egg custard

swiss chard and winter squash salad with pomegranate vinaigrette

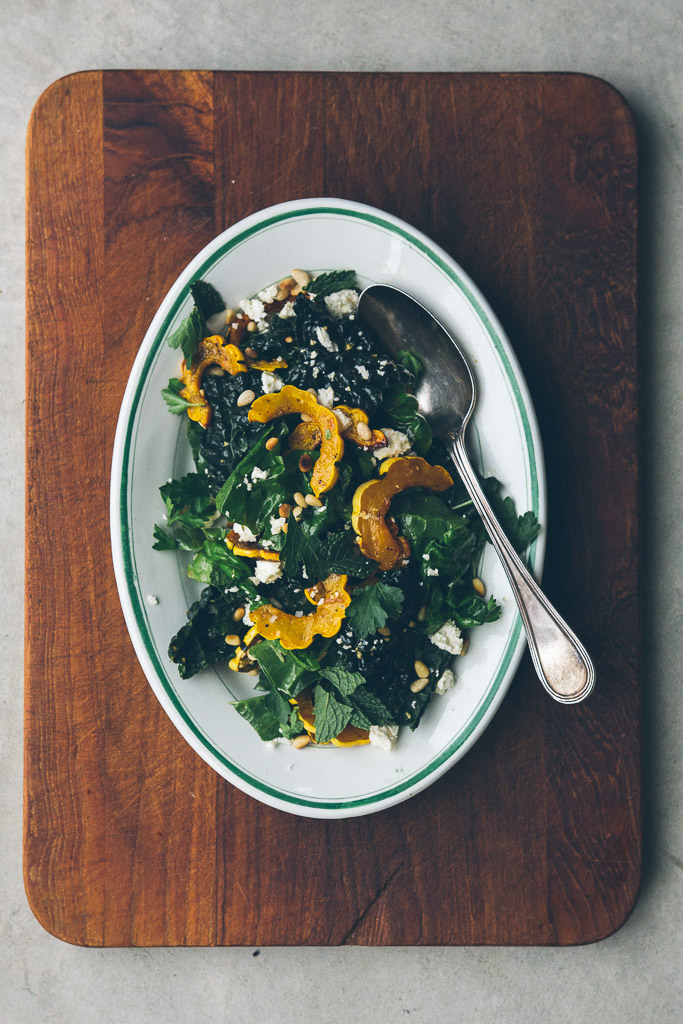
swiss chard and squash salad // millys-kitchen.com

I’m a little later getting this post up than I’d hoped. This is mainly because I was in a foul mood when I returned to Seattle from my trip to Portugal, Brussels and Paris. 

Monday was especially rough. I woke to a gunmetal sky and crushing rain. The idea of returning to the daily mundanities of doing dishes, answering email and paying bills left me huddled beneath the covers, imagining myself back to the limestone streets of Lisbon. Eventually, I managed to roll out of bed, dress and get on with the business of day-to-day life. 

home // millys-kitchen.com

Somewhere in the middle of this stormy week, a small shift took hold. I unpacked my suitcases and fell into the familiar rhythms of cooking breakfast, doing laundry, watering plants. I snuggled my cat and brewed pots of tea. I settled into being Home.

home // millys-kitchen.com

When I was finally ready to sit down and write this post, it occurred to me that those little rituals of home are what cured me of my post-travel blues. And none more so than the pleasure of being back in my own kitchen, cooking for loved ones.

home // millys-kitchen.com

Thanksgiving is right around the corner. And while I’m not a huge fan of all the holiday pomp, I am ever in favor of cooking for those you love. I made this salad for Beau and I this week and realized that it would be right at home on the holiday table. Any leftover salad is wonderful with pieces of roast chicken (or turkey) tossed in. And I have a hunch that a few spoonfuls of cranberry sauce would play right along with the sweet squash and toasty pine nuts. 

swiss chard and squash salad // millys-kitchen.com

I’m finally feeling happy to be home. I’m looking forward to the traditions that make the holidays bright. And, more than ever, I’m appreciating the little rituals that connect our days. For me, one of those rituals is sharing my travels and photos and recipes with you. So thank you for being here, part of the home it feels so good to return to!


Swiss Chard and Winter Squash Salad with Pomegranate Vinaigrette

  • 2 lbs. delicata squash, halved lengthwise, seeded and sliced into 1/4-inch thick half moons
  • 6 tablespoons extra-virgin olive oil, plus additional for roasting the squash
  • Sea salt and freshly-ground black pepper
  • 1 small shallot, minced (should yield 2-3 tablespoons)
  • 1 1/2 tablespoons red wine vinegar
  • 3 tablespoons pomegranate molasses
  • 1 bunch Swiss chard, stems removed and torn into bite-sized pieces
  • 1 bunch kale, stems removed and torn into bite-sized pieces
  • 3 tablespoons flat-leaf parsley leaves, roughly torn if large
  • 3 tablespoons mint leaves, roughly torn if large
  • 1/3 cup toasted pine nuts
  • 1/3 cup crumbled feta
swiss chard and squash salad // millys-kitchen.com

* Notes: I like the way the delicata looks in this salad and the fact that you don’t have to peel it , but any winter squash will work here. If you’re using a different squash, I recommend cutting it into 3/4 cubes (for a squash like butternut) or 1/2 inch slices (for a squash like acorn). Cook time will vary depending on the squash and how thickly you’ve cut it, but should range from 20-35 minutes.

- For this salad, I look for Swiss chard with white stems. The ones with red and orange stems have a mineral beet flavor that I don't like as well in this recipe.

- I use lacinato kale in raw salads because I think it's the most tender. 

swiss chard and squash salad // millys-kitchen.com


Preheat the oven to 475°F. Line a sheet pan with parchment paper. Place the squash on the sheet pan and toss with olive oil to lightly coat. Season generously with salt and pepper. Roast, turning squash after 10 minutes, until light golden-brown and cooked through, about 20-25 minutes total. When the squash is done roasting, set it aside to cool.

While the squash is cooking, make the vinaigrette. In a medium bowl, combine the shallot, red wine vinegar, pomegranate molasses, a generous pinch of salt and a few grindings of black pepper. If you have time, let this sit for 10-15 minutes to mellow the shallot. Whisk in 6 tablespoons of olive oil. Taste and adjust seasonings. Set aside.

swiss chard and squash salad // millys-kitchen.com

To assemble, place the Swiss chard and kale in a large bowl. Add the mint, parsley, 2/3 of the cooled squash and half the pine nuts to the bowl with the greens. Lightly dress the salad with the vinaigrette. Taste and add a bit more dressing if necessary. Arrange the salad on a serving platter and top with the rest of the squash and pine nuts. Crumble the feta over the top and serve.

Makes 4-6 servings.

home // millys-kitchen.com

apple cake with maple and hard cider

apple cake with maple and hard cider // millys-kitchen.com

Hello, friends!

I’m in Lisbon this week preparing for my Portugal culinary tour, which starts on Monday. I am currently so jet-lagged I barely know my own name. Does anyone else have this problem? More importantly, does anyone have a brilliant solution for staving off the zombie-like disorientation and fatigue of leaping multiple timezones? If so, please do share your advice!

In the midst of all my prepping and packing and customary pre-trip stress, however, I managed to slip in a day of apple picking last weekend. My friend Sharon organizes an annual day of picking and cider tasting at her orchard and cidery in eastern Washington. So every October, I gather a group of friends and head over the pass and through miles of beautiful high dessert to Tieton, a little town just past Yakima, for one of my favorite fall traditions. 

apple cake with maple and hard cider // millys-kitchen.com

This year was perhaps the best year of apple picking yet. The thick veil of fog that greeted us at the pass, dissipated once we descended into the rolling pastures on the other side of the mountains. Leaving us with an absolutely perfect fall day: golden foliage, bright sunshine and blue sky. 

apple cake with maple and hard cider // millys-kitchen.com

And the apples! I learned about Sharon and her husband Craig and Harmony Orchards, after Rowan Jacobsen sang the praises of their amazing apples in his book, American Terroir, documenting the best growing places and producers in the country. He calls theirs some of the best apples in America, benefiting from an ideal climate of long, hot summer days and cool nights, enough wind to keep pests at bay, and a high-altitude location that yields apples with a dense, extra-crisp cell structure. 

I have to agree; these are undeniably the best apples I’ve ever tasted. 

apple cake with maple and hard cider // millys-kitchen.com

Every year we pick as much as we think we can store and distribute bags to Seattle friends who couldn’t come out to pick. Beau and I usually turn many of those apples into applesauce, which needs virtually no sugar due to the amazing sweetness of the Harmony Orchards’ Ambrosias and Jonagolds, and no lemon juice thanks to the wonderful sweet-tart and floral notes of their heirloom Ashmead’s Kernels. We make quarts and quarts of applesauce and stock it in the freezer, hoping it will last at least until the new year. It never does.

apple cake with maple and hard cider // millys-kitchen.com

This year, I wanted to make an apple recipe to share with you. I thought most of you probably had applesauce mastered, so decided on this fantastic apple cake instead. It’s adapted from Dorie Greenspan’s French Apple Cake. I added reduced apple cider to create layers of apple flavor as well as vanilla bean and maple syrup to round out the tart edges of the apples. I also favor slicing the apples instead of dicing them and layering some over the batter for a slightly fancier presentation. Like all my favorite recipes, it’s easy (you don’t even need to pull out your mixer), delicious and beautiful.

apple cake with maple and hard cider // millys-kitchen.com

I hope you enjoy this cake. It by no means requires the sublime apples Craig and Sharon grow at Harmony Orchards to be fantastic. I’ve made it many times with store-bought apples and it’s never failed to delight. Let me know in the comments if you have any questions on technique or substitutions, and of course if you have that magic cure for jet-lag!

xo,

Olaiya

apple cake with maple and hard cider // millys-kitchen.com

Apple Cake with Maple and Hard Cider

  • 4 oz (1 stick) unsalted butter, melted and cooled to room temperature, plus additional for the pan
  • 6 oz (3/4 cup) granulated sugar, plus additional for the pan and for sprinkling
  • 6 tablespoons hard cider
  • 1 tablespoon maple syrup, preferably grade B
  • 1/2 vanilla bean
  • 3.75 oz (generous 3/4 cup) all-purpose flour
  • 3/4 teaspoon baking powder
  • Pinch of salt
  • 2 large eggs, room temperature
  • 1 ¼ lb apples, about 4 medium (a mix of sweet and tart varieties), peeled and sliced ¼-inch thick

*Notes: This cake keeps, loosely covered with a tea towel at room temperature, for up to 3 days. I think it tastes best on days 2 and 3.

- Any dry or semi-dry hard cider will work nicely in this cake, but I especially like Tieton Cider Works Wild Washington Cider, because it’s delicious and also because once the bottle is open, I have to finish it!

- You can also make this cake in a removable-bottom tart pan (like I did). Be sure to wrap the bottom of the pan tightly with foil or some of the batter, which becomes slightly thinner once in the oven, will drip out the bottom and burn. I learned this the hard way. Luckily you get the benefit of my mistake and no smokey oven full of burnt cake batter! 

apple cake with maple and hard cider // millys-kitchen.com


Preheat the oven to 350° F. Generously butter an 8-inch springform pan. Coat the bottom and sides of the pan with granulated sugar then tap out the excess. Set aside.

Place the cider in a small saucepan and reduce by half over medium-high heat. Set aside to cool slightly, then stir in the maple syrup.

While the cider is cooling, use a paring knife to halve the vanilla bean lengthwise. Scrape the seeds from the pod using the blade of the paring knife. Add the vanilla seeds to the sugar in a small bowl. Use your fingers to rub the vanilla seeds into the sugar. (This will keep the vanilla from clumping together in the batter.) 

In a medium bowl, combine the flour, baking power and salt. Whisk well to combine. 

Crack the eggs into a large bowl. Whisk until frothy then add the vanilla sugar. Continue to whisk until the eggs look frothy again and the sugar is starting to dissolve, a minute or so longer. Whisk in the cider-maple reduction then whisk in half the flour mixture. When the flour is just incorporated, add half the butter, then the rest of the flour mixture and then the rest of the butter, whisking after each addition until you have a smooth, fairly thick batter.

Pour a little more than half the apples into the prepared cake pan. Pour the cake batter over the apples and smooth the top with a flexible spatula so no bits of apple are sticking up through the batter. Arrange the rest of the apples over the top of the batter in 1 or 2 slightly overlapping concentric circles. Sprinkle with 2 tablespoons of sugar, if desired, to make the top a bit more golden and crunchy.

Bake the cake, rotating after 30 minutes, for 50-60 minutes total, until the top of the cake is golden brown, a toothpick inserted into the center comes out clean and the cake pulls away from the sides of the pan. Transfer to a cooling rack and let rest for 5 minutes. Carefully run a butter knife around the sides of the cake to loosen it from the pan, then unmold and cool completely on the wire rack before slicing.

Yield: 6-8 servings

apple cake with maple and hard cider // millys-kitchen.com

Adapted from Dorie Greenspan via David Lebovitz