healthy

roasted white beans with fennel + mint chimichurri

Image: Olaiya Land

Ok. It’s time to get real with y’all. I have struggled with my weight for pretty much my entire life. As I wrote about in this post, I was a chubby bi-racial kid growing up in a super white, rural farming community. We moved to Wichita when I was 9, where I was the chubby brown girl who didn’t quite fit in with the white kids and wasn’t quite accepted by the black kids. I have a vivid memory of bawling my head off around this age because my hair wasn’t long and straight and blond like my mother’s. From the time I can remember anything, I remember feeling like I didn't belong. 

As a single-parent, my mom worked a lot when I was little. I spent most of my days with my grandparents, both of whom had lived through the Great Depression. They kept their house stocked to the rafters with every manner of foodstuff imaginable. They fed me sugar cereal, mac-n-cheese and candy bars. Fried chicken, frozen pizza and Hostess fruit pies. 

Food was love. And they loved the shit out of me. 

Image: Olaiya Land

It was the early 80s and we didn’t know as much back then about how sugar and processed carbs are essentially garbage. I know my grandparents just wanted to spoil me--their only grandchild for 9 years--and make sure I never went without the pleasures they had to forgo as children.

Food was my solace and my secret shame. By the time I was 12, I had a full-on eating disorder. I wanted to be thin and popular and look like the other girls at a time when almost no one looked like me. But I needed food to assuage my awkwardness and my fear of not being good enough. It was a vicious cycle.

Image: Olaiya Land

Fast-forward to adulthood. I’ve learned to love myself and love the body that I’m in. But it’s been a long road. From the time I graduated college until today, I’ve experimented with a vast panoply of diets. Weight Watchers. The Zone. Atkins. Keto. Low-fat. High-fat. Intuitive Eating. Extreme calorie restriction. The works. 

Things started to get better in the body kindness department the day I banished my scale. That sly dictator lounging under the bathroom sink had been running my life for years. I decided he had to go. Not weighing myself has been a major boost to my self-esteem. (And I’m serious about it--I don’t even let my doctor tell me my weight when I go to see her.) 

Next came finding a way of eating that works for me. I’ve been tweaking this over the past couple of years, but the gist of it is that I go easy on the sugar and carbs. I’ve learned that counting calories is absolutely toxic for me; I quickly tip over into crazytown if I go down that path, anxiously obsessing over everything that goes in my mouth. 

Image: Olaiya Land
Image: Olaiya Land
Image: Olaiya Land

I’m currently eating slow carb, which means lots of vegetables, protein, healthy fats and unrefined carbs, like beans and lentils. And zero calorie counting. Saturday is a free day when I eat whatever I want. So I don’t feel like anything is permanently out of bounds. (A girl has to get her pizza on from time to time!)

On the exercise front, I’ve decided only to do activities that I would do even if they burned no calories. I will play tennis in the freezing cold or blistering heat. I'd play in the rain if I could. There’s almost nothing that can keep me off the courts. So this is definitely on the list. I do strength training that involves a lot of balancing and compound movements because it feels like play and makes me feel strong and capable. And I walk with Beau in the evenings. That’s it. 

Image: Olaiya Land

So, about these beans. 

A slow-carb lifestyle involves A LOT of beans. And though I love beans in all their many shapes and sizes, here’s the truth of the matter: beans can get pretty boring when you eat them night after night.

One evening, I decided to toss some beans in with the vegetables I was roasting. What came out of the oven was AMAZING. (Some might even call it culinary genius. I’m not saying who.) These roasted beans were crispy on the outside and pillowy soft on the inside. Like dreamy little roasted potatoes. Or tater tots. Only healthier. 

Image: Olaiya Land

Now I am obsessed with roasted beans. They are my new go-to weeknight starch. I toss them on a sheet pan along with whatever vegetables I have lazing around in my fridge. Thirty minutes later--voilà! Supper is served. If you’re feeling fancy, poach a couple eggs or throw a piece of fish on the grill to serve alongside. Add a squeeze of lemon or a few dashes of hot sauce. It’s hard to go wrong.

For those of you who are perhaps less experimental in the kitchen, here is a recipe to get you started. You roast up a tray of plump corona beans (or gigantes or any other large bean really) with a bit of shallot. Grill up some squid (if you’re into seafood). Add some shaved fennel for crunch and a fresh, zingy chimichurri and your weeknight supper just got extra sexy.

Wherever you are in your relationship with food and your body, I think you can feel pretty good about this salad. It’s delicious whole foods, simply prepared. Miles away from Kraft mac-n-cheese and Hostess fruit pies. But with all the love.

XO,

Olaiya


Image: Olaiya Land

Roasted White Beans with Fennel and Mint Chimichurri

  • 4 cups cooked corona beans (or other large white beans), rinsed
  • 1 medium shallot, sliced
  • Extra-virgin olive oil
  • Sea salt
  • finely grated zest of 1 lemon
  • 2 tablespoons lemon juice, plus an extra squeeze for the fennel
  • 2 large cloves of garlic, finely minced or pressed
  • 1 teaspoon chopped calabrian chiles in oil or a generous pinch of chile flakes
  • 1/2 cup roughly chopped fresh mint, plus additional mint to garnish
  • 1/2 medium fennel bulb, fronds reserved for garnish
  • 1 recipe Grilled Squid (see below), optional

*Notes: Canned beans will work for this recipe, but home cooked beans are best. Plus it's difficult to find large beans like coronas or gigantes in a can. Here are some tips on how to cook a perfect pot of beans.

- When it comes to Calabrian chiles, I love this brand. (Seattle friends: I buy these at PFI in SoDo)

- Grilled octopus would also be delicious in this recipe!


Preheat your oven to 475° F.

While the oven is preheating, dry your beans thoroughly with paper towels then transfer them to a sheet pan lined with parchment paper. Scatter the sliced shallot over the beans and sprinkle with salt. Drizzle generously with olive oil and toss to coat the beans and the shallot. When the oven is hot, roast the beans, stirring occasionally for even browning, for 12-20 minutes. The exact time will depend on the size of your beans and how wet they are when they go in. You want them to be golden brown in spots, crispy on the outside and tender and fluffy on the inside. Don't worry if some of them split open. Remove them from the oven and set aside to cool.

While the beans are cooking, make the chimichurri: in a medium bowl, stir together 6 tablespoons of the olive oil along with the lemon zest, juice, garlic, chiles, mint and a pinch of salt.

With a sharp knife, Japanese slicer or mandoline, thinly slice the fennel and place it in a bowl. Toss it with a tablespoon or so of the chimichurri and an extra squeeze of lemon juice. Taste and add more chimichurri or lemon juice if you like.

When the beans have cooled somewhat, drizzle most of the chimichurri over them (save a tablespoon or so if you are making the squid). Toss to coat. Season to taste with more salt if necessary. Place the seasoned beans in a serving bowl and top with the dressed fennel and the grilled squid (if you're adding them). Sprinkle the reserved mint and torn fennel fronds over the salad and serve. 


Tender Grilled Squid

• 1 lb. squid, cleaned, cut into large pieces and patted very dry with paper towels
• Extra-virgin olive oil
• Sea salt

*Note: You can buy cleaned, pre-cut squid from your fishmonger or clean it yourself, which is a lot cheaper. Here's a video if you need help.

Roasted Beans with Fennel and Squid-15.jpg

Heat a large pan over high heat for a minute or so. Add enough olive oil to film the bottom of the pan, then add the squid pieces. Cook, stirring occasionally, until the squid is opaque and just barely cooked through, 2-4 minutes. It will give off a lot of water. Don't worry, this is normal. Do not overcook the squid or it will get rubbery.

Immediately transfer the squid to a large plate to cool. While the squid is cooling, heat a grill or grill pan to high heat.

Toss the squid in olive oil to barely coat (use some of the mint chimichurri if you have it) then grill until char marks appear, 1-2 minutes. Turn and grill for another minute or so until char marks appear on the other side. Transfer to a bowl to cool or eat immediately. 


smoky tomato broth with masa dumplings and black beans

smoky tomato broth with masa dumplings || millys-kitchen.com

After my trips to Paris and Oaxaca, arriving home in the middle of our depressing political situation and abysmal Seattle weather had me in a proper funk.

The kind of funk that leaves you struggling to get out of bed in the morning. A funk that makes eating cookies for breakfast, lunch and dinner sound like a good idea. The sort of funk that requires spending as much time as possible in stretchy clothing (preferably pyjamas) in order to avoid feeling bad about all those cookies you ate.

smoky tomato broth with masa dumplings || millys-kitchen.com

But the good news is I think I’m finally emerging from this tailspin. 

Beau once told me about a Kanye interview in which Mr. West declared his personal mantra: “My life is dope and I only do dope things.” Now, when I find myself feeling small or like an impostor or afraid to pursue my dreams, I try to channel Kanye’s manifesto of personal awesomeness. 

smoky tomato broth with masa dumplings || millys-kitchen.com

To that end, I have started taking better care of myself again. I’m wearing grown-up clothes with zippers and buttons instead of lycra and spandex. I have replaced cookies with home-cooked meals. I’ve booked tickets to go see my best friend and her kidlets in Wichita and to spend some time under the California sun. I’m planning some fun travel around my Paris workshop in May (Hello, Scotland!). I’m organizing volunteers and testing recipes for next week’s Love Trumps Hate fundraising dinner

smoky tomato broth with masa dumplings || millys-kitchen.com

Earlier this week, I wanted to go back to bed and sleep until summertime. Today, I managed to shop for, test and shoot this Smoky Tomato Broth with Masa Dumplings and Black Beans. So things are looking up!

Hoping things are looking bright for you this weekend and sending you a reminder that your life is dope and you should only do dope things!

XO,

Olaiya


Smoky Tomato Broth with Masa Dumplings and Black Beans

  • 1/2 cup dried black beans, soaked and cooked (or 1 can black beans)
  • 1 large onion
  • 4 dried smoked serranos (or other smoky dried chiles)
  • 2 teaspoons whole cumin seed
  • 2 tablespoons neutral tasting high-heat oil (I used avocado oil), plus additional for frying the dumplings
  • 2 cloves garlic, minced
  • 3 avocado leaves or 2 bay leaves
  • 1 stick canela (Mexican cinnamon, also known as Ceylon or true cinnamon)
  • 1 28-oz can whole peeled tomatoes or diced tomatoes
  • 2 tablespoons Mexican chocolate or cocoa powder
  • 3-4 cups bean cooking liquid or vegetable or chicken stock (preferably homemade)
  • Salt, to taste
  • Piloncillo or brown sugar, to taste
  • 1 cup instant masa harina
  • 1 thinly sliced avocado, to serve
  • ½ cup crumbled queso fresco (or mild feta), to serve
  • ¼ cup cilantro leaves, to serve

*Notes: Home cooked beans are best in this recipe but canned will work in a pinch. 

- I recommend searching out the specialty Mexican ingredients in this recipe if you can. If there’s a Mexican tienda near you, you’ll likely be able to find them there. If not, you can order on-line. I get it if you don’t want to track them all down, but this soup is so much more wonderful and subtle with these ingredients instead of substitutes.

- For the masa dumplings, called chochoyotes, you can fry them as I call for in this recipe or you can cook them in your soup for 10-15 minutes until they’re cooked through. I like the crunch of the fried chochoyotes to add some textural variance, but they’re delicious both ways.

- The broth tastes even better the next day, so make it a day in advance if you have time. The dumplings should be made just before serving.

- I wanted to keep this recipe vegan- and vegetarian-friendly, but you can use lard instead of oil if you want. You can also add a tablespoon of lard to the dumpling dough to make your dumplings a bit more tender. If you have access to the lard left over from making chicharrones, a) you are a very lucky person and b) you should use that.

- To turn this soup into a heartier meal, you can add a poached egg or two or some shredded cooked chicken or pork.

smoky tomato broth with masa dumplings || millys-kitchen.com

Soup prep
If you've cooked your own beans, let them cool in their cooking water then remove them with a slotted spoon (dumping them into a colander while they’re hot leads to smooshed beans). Be sure to reserve the cooking liquid. If you’re using canned, drain and rinse them before using. Set aside.

Preheat your broiler and line a sheet pan with foil. Peel your onion. Leave the root end intact but trim the hairs down. Slice the onion in half through the root end then slice each half into sixths, so that each section has a little bit of the root holding it together. Place the onion, cut-side-down on your sheet pan and broil until the onion is nice and charred (but not burnt to a crisp). Flip and cook until the other side looks the same then remove from the oven and set aside to cool. (You can do this on a grill heated to high if you prefer.)

Place the smoked serranos in a heatproof bowl and cover with 2 cups of boiling water. Set aside for at least 30 minutes to soften. Do not discard the soaking liquid.

Toast the cumin seeds in a heavy pan over medium-low heat until fragrant and a shade or two darker. Set aside to cool before grinding them in a spice grinder. Set ground cumin aside. 


To make the soup
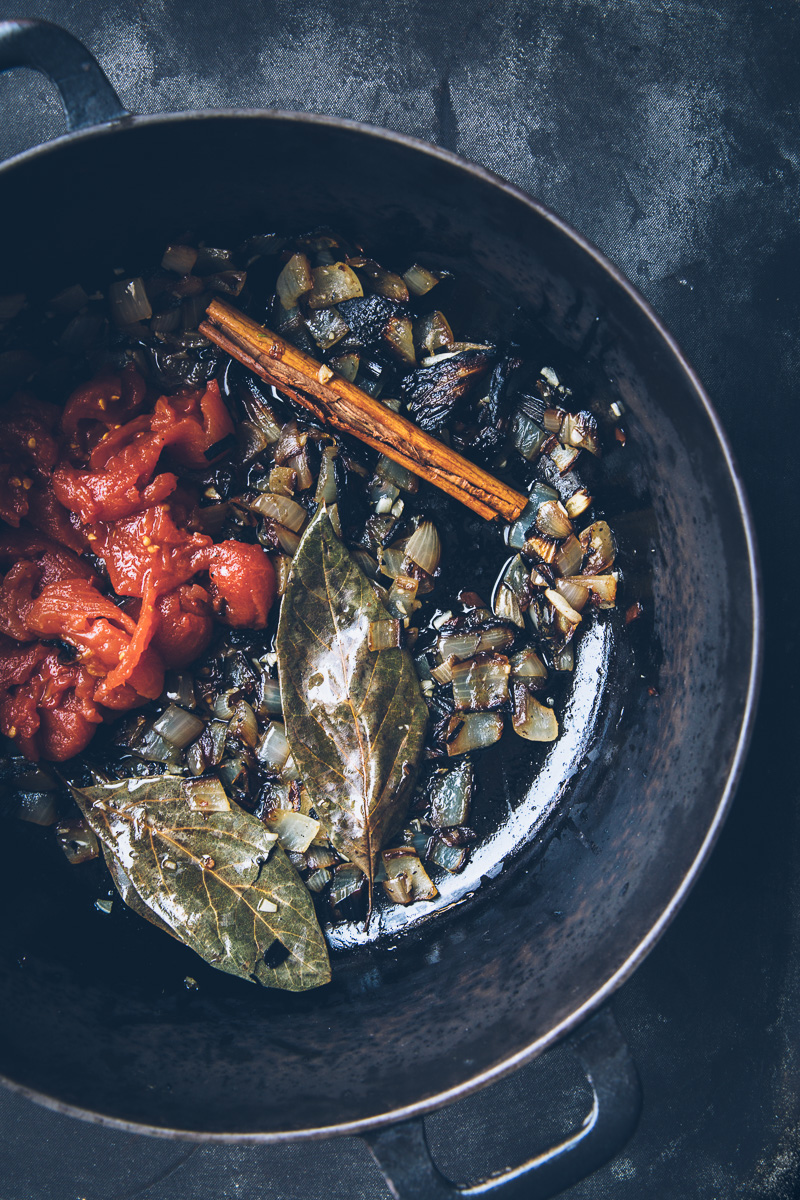
When the onions have cooled enough to be handled, roughly dice them, discarding the root ends. Dice enough of the soaked chiles to yield 2 teaspoons (discard the seeds unless you LOVE super spicy food). Heat 2 tablespoons of the oil in a heavy-bottomed stock pot or Dutch oven over medium heat. Add the diced onion, garlic, avocado leaves and 2 teaspoons of the diced chiles. Cook until the onions and garlic have softened, about 5 minutes) then add the canela and ground cumin. Cook for 1 minute, stirring often. 

Add the tomatoes with their juice, Mexican chocolate or cocoa powder, 3 cups of the bean cooking liquid or stock, ½ cup of the chile soaking liquid and a generous pinch of salt. If you want more spice, add more of the chile soaking water and/or diced chiles. Add piloncillo or brown sugar to taste--you want just enough to balance out the acid in the tomatoes and any bitterness from the chocolate. Bring to the boil over high heat then reduce heat to low and cook, covered, at a bare simmer for 30-40 minutes. 

While the soup is simmering, make the chochoyote (dumpling) dough. In a medium bowl, mix the masa harina, a generous pinch of salt and ½ cup plus 3 tablespoons hot water. Knead until pliable and smooth, about a minute. Form the dough into a ball, wrap tightly with plastic wrap and rest for 30 minutes.

When the broth is done, carefully strain it through a sieve, pressing on the solids to extract as much liquid as possible. If your broth is thicker than you’d like, add a bit more bean liquid, stock or water to thin it. Taste and adjust seasonings. Return to the pot, add the beans, and keep warm while you make the chochoyotes.

Pour high-heat vegetable oil to a depth of 1 ½ inches in a small saucepan. Heat over medium heat to around 325°F. While the oil is heating, cut the dough into quarters and roll each quarter into a log roughly 1-inch thick. Use a knife or bench scraper to cut the log into 1-inch pieces. Roll a piece of dough into a ball then place on your work surface and use your finger to make a deep indentation in the ball. Repeat with the rest of the dough. 

Add some of the dumplings to the hot oil, taking care not to crowd the pan. Fry, turning once, until golden brown, about 4 minutes. Transfer cooked chochoyotes to a paper towel lined plate and salt generously. Repeat with the rest of the dumplings.

Ladle the hot soup into serving bowls. Add a few of the chochoyotes and garnish with avocado, queso fresco and cilantro. Serve immediately.

Makes 4-6 servings.

smoky tomato broth with masa dumplings || millys-kitchen.com

chilled spring greens soup with crispy prosciutto

chilled spring greens soup on millys-kitchen.com

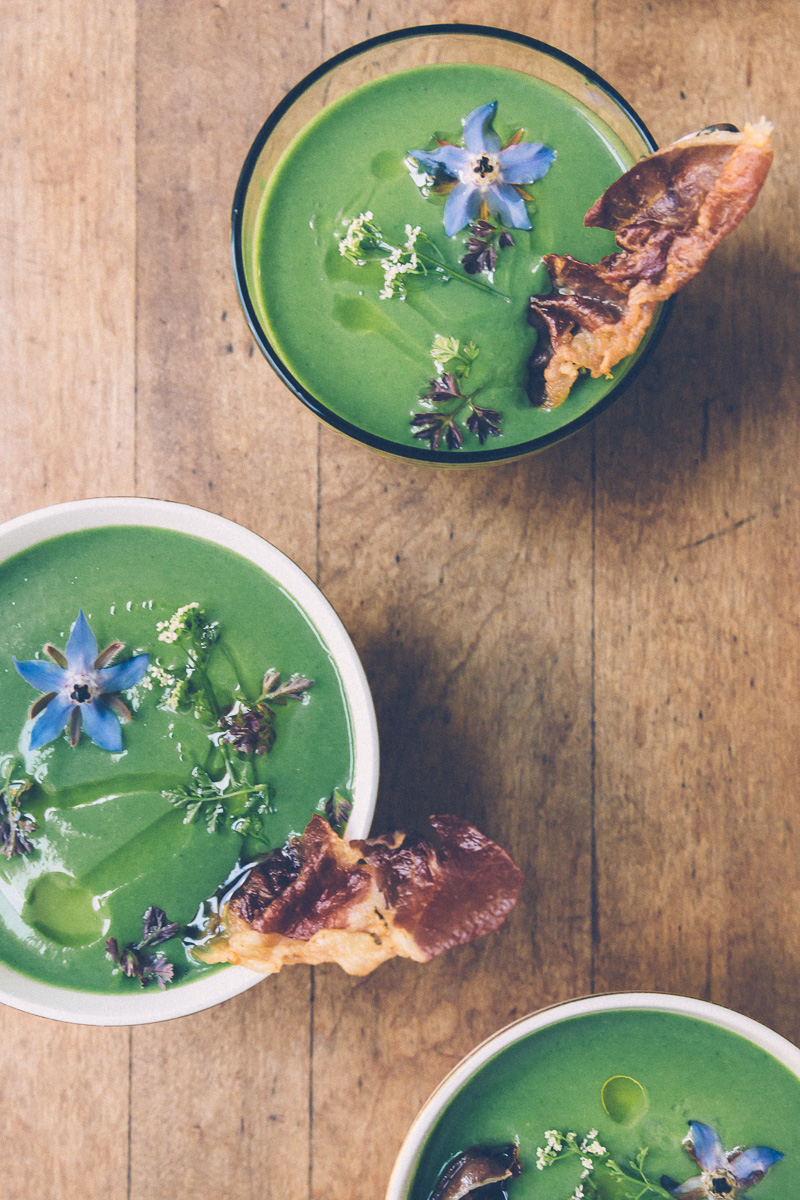
Today, I have for you a chilled spring greens soup with crispy prosciutto. I love this soup because it’s easy and delicious and a great reminder of how being wrong can sometimes save the day.

If you’re anything like me, you’re not necessarily fond of being wrong. Especially in front of other people. But, in it’s own serendipitous way, this soup proved me wonderfully wrong on two occasions. 

chilled spring greens soup on millys-kitchen.com

It’s based on a chilled green soup I had at Frenchie in Paris a few weeks back. If you’re not familiar with Frenchie, you might not know that obtaining a reservation here is a major logistical feat. Or that on any given evening, the sidewalk outside is awash with Beautiful People, smoking and laughing and being generally very sexy and French. I’d scoped it out several times before deciding it couldn’t possibly live up to all the hype and striking it off my list. 

To be perfectly honest, I was intimidated by the effort required to secure a table. And all that sexy Frenchness. 

chilled spring greens soup on millys-kitchen.com

But when the lovely Sarah Pank, chief miracle-worker at Apartments Actually, managed to snag us a reservation, I wasn’t about to say no. Accepting her gracious offer was one of the smartest things I’ve done recently because, friends, that meal was phenomenal. All seven gorgeous courses of it. Working my way through crisp, seed-crusted cauliflower and silky foie-gras with apple confit and fresh berries with herbed ice cream, I savored every second of having my assumptions overturned.

A highlight of the meal was one of the the amuses-bouches: a tiny earthenware cup of chilled green soup, garnished with edible flowers, crunchy cured ham and creamy feta. It tasted like spring. When Beth suggested we try to recreate the soup as part of a lunch for our retreat guests, I was skeptical. It’s too cold out for a chilled soup. There’s no way we can come up with something as magical as the Frenchie version! Do people even like cold soup anyway?!? 

chilled spring greens soup on millys-kitchen.com

Beth gently insisted and I decided it wasn’t worth arguing over. The green soup I ended up making was fresh and bright. A riff on the classic marriage of peas and ham, in a springier incarnation. We garnished it with a few drops of pistachio oil and crumbles of salty jambon de Bayonne from the market. It was my favorite part of the lunch. 

So in addition to being fresh and light and just the sort of thing I want to eat on a warm spring day, this soup serves as a reminder that I don’t know nearly as much as I think I know. And that that’s a wonderful thing.

chilled spring greens soup on millys-kitchen.com

P.S. The Paris culinary retreat sold out in record time. (Thank you all for your wonderful support!) A lot of you wrote me asking about upcoming trips, so I wanted to let you know I've got details on the Portugal retreat headed your way next week. If you're not already on my mailing list, sign up here to get priority notice for all upcoming tours and events. XO!


Chilled Spring Greens Soup with Crispy Prosciutto

Chilled Spring Greens Soup with Crispy Prosciutto

  • 5 tablespoons extra virgin olive oil, divided
  • ½ a medium fennel bulb, diced
  • 1 teaspoon coarse sea salt, divided
  • 3 medium zucchini
  • 1 large bunch spinach (about 1 lb), rinsed and tough stems removed
  • ½ cup loosely packed flat leaf parsley
  • 2 cups English peas (from about 2 lbs. unshelled peas)
  • 1 small head green garlic (or 2 cloves regular garlic), thinly sliced
  • 2 tablespoons fresh-squeezed lemon juice
  • 1 tablespoon white balsamic vinegar
  • 6 very thin slices prosciutto (serrano ham, jambon de Bayonne and pancetta are great also)
  • Pistachio oil, to garnish (or good quality extra-virgin olive oil)
  • Edible flowers, to garnish (I used borage, chervil and thyme flowers from my garden)

*Notes: Feel free to substitute herbs for the edible flowers. You’ll want to use more delicately flavored herbs so they don’t overwhelm the soup. Fennel fronds, tarragon, thyme leaves, small mint or basil leaves, or a few snipped chives would work well.

- If you don’t plan to eat all the soup at once, add the lemon juice and vinegar only to what you plan to eat at one sitting. They will cause the soup to lose its color if added too far in advance. (It tastes fine, but looks a little drab.)

- For a vegetarian or vegan version, substitute a creamy feta or some finely-chopped pistachios for the prosciutto.

chilled spring greens soup on millys-kitchen.com

Heat 4 tablespoons of the oil in a Dutch oven or heavy-bottomed stock pot over low heat. Add the fennel and half the salt. Cover and cook, stirring occasionally, until very tender, about 20 minutes. You don’t want the fennel to brown. Add the zucchini and cook for 5 minutes. Add the spinach, parsley, peas, garlic, the remaining ½ teaspoon salt and 3 cups of water. Raise the heat to medium and cook, covered, until the spinach has just wilted and the peas are tender, about 5 minutes longer. Take care not to overcook the vegetable or the soup will lose its bright color.

Remove the soup from the heat and puree in a blender in batches until very smooth. Take care not to fill your blender more than ⅔ full so the steam from the soup doesn’t blow the top off and burn you. If you don’t have a blender powerful enough to puree the soup very fine, strain it through a fine mesh sieve. Transfer the pureed soup to a large bowl, thin with cold water to your desired consistency and place in the fridge to cool completely.

Remove the soup from the fridge 30 minutes to one hour before serving so it can warm up a bit. (When it’s ice cold, it looses some of it's depth.) Add the lemon juice and vinegar just before serving. Taste and add more salt and/or acid as necessary.

While the soup is warming up, crisp the prosciutto. Heat the remaining tablespoon of oil over medium heat in a large sauté pan. Add the ham and cook, turning once or twice until crisp, about 5 mins. Transfer to a  paper towel lined plate to cool slightly.

To serve, ladle the soup into serving bowls and garnish with a swirl of the pistachio (or olive) oil. Top with edible flowers and serve with the crispy prosciutto.

Makes 6 first-course servings.

chilled spring greens soup on millys-kitchen.com